Monday, August 19, 2019

Getting the AC mounted (part 1)

The last major project before we could have it "officially" registered as a motorhome was to get an HVAC system installed that was not powered by the vehicle engine. I had been looking for a truck which already had an APU (auxiliary power unit) installed as that would have made things a lot simpler. However, when I found this one and it didn't have one I already had a plan. The plan was to use a mini-split. There have been some folk who question the durability of using a mini-split on a vehicle, but I have talked with several tiny house folks who have had them mounted on their trailers and have been fine. I found an in-expensive one ($670) on Amazon. This would give me the option to try it out and if it fails, then would have to look for another option. The one I am using is  by Klimaire. It got good reviews and is pre-charged with 410a Freon.

The package arrived by freight so had to be home to get it and was several boxes strapped to a pallet. I was able to get it onto a dolly and in the garage fairly easily.  The install instructions looked straight forward.

The first obstacle was mounting the units. For a mini split there is an indoor unit, 4 feet by about 12 inches, and an outdoor unit, about 4 feet by 2 feet.  For the inside, the first was to remove the shelving on the back wall of the cab. I honestly have no idea why International has this big huge thing. but it was easy to remove with about 6 bolts holding it to the wall. This did leave the back of the cab a bit unsightly.


I had found at the hardware store some mounting bars called super strut. I think they are normally used for mounting electrical boxes and such. Superstrut There also have special fasteners which slide into the rails. The plan was to build me a frame, mounting it to the same holes the shelving unit used, and it worked great. The only issue came when it was time to use the fasteners. They are held inplace by springs and the springs are only good on the wider channel. A quick cut with the Dremal and we had them working. The frame for the inside unit consisted of two horizontal bars tided to the wall. Then two vertical bars spaced where I needed them for the mounting bracket for the indoor unit.

Once all that was in place it was time to fit up the inside unit.

Where it is currently mounted my cause issue when I later get the upper bunk, but I think I can slide it down far enough on those rails to the clearance I need and to get the bunk in. Only time will tell. 

Next up, mounting the outside unit, then we get it inspected and weighed. For those of you wondering, I have yet to drive it. 


Sunday, June 16, 2019

We have the POWER.....

Meeting the 110V requirement I thought would be the easiest part; however, I soon found out that would not be the case. The plan was simple, Add an inlet on the outside of the truck so that I could plug into either a generator (when stopped overnight or boon docking) or campground power, when I was staying someplace with electric. I know that my Dads hunting property would be getting power and a few of my more permanent locations i would also expect to have grid power. I wanted to go with 30 amp service even though I thought it would be overkill for the truck. The small travel trailer i have now has 30 amp service mostly to power the air conditioner. I have however, run the AC on just a standard 15/20 amp circuit.

After some research, I we looking at transfer switches and other options I found a complete kit at Home Depot. It was by Reliance energy and even came with the generator cord and the outlet box. I was all pre-wired so I thought this was a slam dunk.

It was easy to attach the outlet box to the corner of the truck where I would have easy access .
There was only one issue. The inlet box had a 4 prong 30 amp (L14-30) plug and the the generator has a three prong (L5-30) outlet. More research leads me to learn that it is designed to have two branches (240v) which splits over the 6 circuits. Without a 240V circuit, I would only get power to half the plugs. 

The other issue was the size of the transfer switch box. The plan was to mount the transfer switch in either the luggage box or under the bunk. It would have to be mounted sideways as it was a bit tall to fit in either spot.

With these two issue, I contacted Reliance and found they found an external box which was wired for just 110V circuits and has a L5-30 plug.

It is now on order and should be here in a few days. We will mount this one in about the same place on the outside and then run all the wiring.

Monday, May 27, 2019

Tiny kitchen

The next project was to get my cooktop installed. The truck has to have a cooktop powered by an internal fuel source in order for it to be registered as an RV. So my solution to this was to use a small cook top and mount it in the cabinet above the refrigerator.

The first plan was to move the top and make a new counter top. The top was easy to remove with six screws. This left a great spot to mount the new counter top.

 I started to craft the new top then realized, that it might be easier to just store it in the drawer. All i would have to do was cut a square shelf and add the hole in the center for the cooktop. I would also just drill out holes in the bottom to pass the cord through. Lastly adding a hole for the heat escape. The advantage of doing it in the drawer is that the heat will not be trapped in the drawer and heat the space over the refrigerator as the cook top will now pull out and let the heat escape.

Here is the temporary solution.


Saturday, May 25, 2019

It will keep the food cold....

As electric or gas fridge is one of the requirements for a truck-tracktor (semi truck) to be considered "converted" for habitation.  Here are more details. When I got the truck, it already had a cabinet which was designed to fit a refrigerator. May long hall truckers have them in their trucks to keep food and drinks cold. The cabinet was already wired for 12v power so just had to buy one to put in there. After some research, I found a company called TruckFridge which sells designed to fit in the space left by the manufacture's fridge so I knew this would be an easy install.

I test fitted the fridge and it slipped right in, the only issue was it sat a bit to high as the drawer above it would not go all the way in. However, there was a steel plate which was mounted to the floor. I think the was for a different type of fridge, as my mounting screws were all in the front. This was going to be easy, just had to remove that plate and put it back. After getting the plate removed, I slide the fridge back in and everything worked great. I pulled it back out to hook up the power, slide it in one last time and screwed it in. It now is mounted and ready for use.


Before you ask, no I have not checked to see if it actually works, but the light inside does come on.

Next up is my cooktop.

Friday, May 24, 2019

Just like being 16

I have a learners permit.

On my second attempt, after studying the correct material, I was able pass the written portion of my test in less that 10 mins and only got 3 questions wrong. One of which I disagree with how the question was worded and answers were presented. It was about safety markers for a disabled vehicle. It was something to the effect of "during daylight hours when flares or electric lanterns are not required, these can be used instead." The options were two yellow flags, three yellow reflectors, three red reflectors or two red flags. I chose The three red reflectors. I knew knew you could also use two red lamps, but three is better than two.

From the handbook:
No person shall operate a truck, bus, truck tractor, or any motor vehicle towing a house trailer, upon any highway outside the city limits or upon any divided highway at any time from a half hour after sunset to a half hour before sunrise unless there shall be carried in such vehicle the following: at least three flares, or three red electric lanterns, or three portable red emergency reflectors. During times when lighted lamps are not required two red flags must be used in place of flares, lights, or reflectors

I guess I should have gone with the simple answer that says two red flags when other are not required.

Other than that, getting the learners permit was a breeze. I got there and checked in on the kiosk, and went to the main desk. The lady who had stopped me from taking the test immediately recognized me, and told the person next to her to get the lady in front of me. He quickly had my info in the computer and set me up for my test. I went back knowing I had passed, waited for her and she completed the paperwork. I was out of there in less than 20 mins.

Next step, getting ready to drive.

Wednesday, May 22, 2019

That didn't go as planned

Today I went to take my written test for my Class A exempt license. I had studied the commercial drivers handbook provided by the State of Texas and brought it with me.
Here is San Antonio, we have one of the state's mega centers for issuing drivers licenses. This allows you to "get in line" before you leave for the office. I did that this morning and got a time of 7:35. Now they tell you this is not an appointment, but just a spot in the line.
I arrived in time an got checked in. Then I waited. It was after 8 am when they started calling for folks with my transaction code. Depending on the service you need you are assigned a letter group and then a number. I had the first number of the day for my group, C70001. I got to the assigned desk and tell the guy i need a Class A exempt license for an RV. He is completely puzzled.  After asking for some assistance, got the paperwork done and sent me over to take my test. By this point, I was in a bit of a hurry so I put my book down and tried to get started. The computer didn't work so when and got help, and the lady was able to assign me to another computer. I again put my book down and started the test. I was to the fourth question when a lady walked by and said having the book on the desk was an automatic disqualification. I told i didn't even think about it being there and it was not open and looked over at it, and because of the fold, it had opened to reveal half a page on each side. Now I was completely embarrassed. She looked and the computer, to my paperwork and said she would be back. A few mins went by, seemed like forever, when she came back. In that time another proctor had walked by and asked if i was having and issue. I explained, what happened, and she told me they had probably gone to review the tape to see if I had looked at it. When the first lady returned, she told me I could continue, but the book needed to remain out of sight.
By this point I knew my time was short to get back to work for a meeting. The other thing I noticed was that i didn't remember many of the questions it was asking. In the end I I only got 12 of the 16 questions right I needed to. I reviewed the correct answers, and was surprised that some of the ones I did get wrong were thing i thought I knew, but didn't read either the complete question or all of the answers. I think mostly because I was a little thrown off and then knowing I was rushed. The other thing I noticed was that questions about trailers and air brakes etc were not on there.
I went to get my paperwork completed and the lady who had first noticed the book was the one that helped. I talked to her while she entered all the information. I found out that most of what I concentrated on in the book was not included in the Class A exempt test for RVs. She told me the only section that i needed to focus on was the special requirements for commercial vehicles which was chapter 14.
After I left, I looked and even thought I had read through that chapter once, i found almost every question spelled out. I now have  the right stuff to study so should pass this next time. I know the questions will be different, but understanding what the test will be over helps a lot.

Tuesday, May 21, 2019

Trailer ordered

Today was another of those "big days" in the build process. Not so much in the work I accomplished, but in decision and commitment being made. Today I ordered my custom trailer and put in the first half deposit.
The custom trailer is being made by Tiny House Basics which has several different production facilities. Mine will be made in their Tennessee location and I will be able to pick it up in a few weeks.
I chose Tiny House Basics because they offered a truly custom build. For my tiny house I wanted some very specific features:

  1. Needed the length from the rear of trailer to gooseneck coupler to be 32 feet or less, with a 24 foot lower deck
  2. I wanted the upper deck frame to be flush with the top of the gooseneck just like the main frame
  3. Wanted the front of the gooseneck deck to have "bullnose" front end. I wanted this in hope to reduce the drag. The very front of the trailer would be 5'6" and then would angle back to 8' over the first 2' of the trailer. 
  4. Lastly i wanted the lower deck frame to be extended in-front of the gooseneck risers so that I can build my frame and enclose the risers. This giving me extra storage space. 
After multiple emails, phone calls and drawing exchanges with Joshua, great guy to work with BTW, we decided we were on the same page. I had also sent out request for quotes to multiple other vendors. Several responded they were not able to accommodate the request and some i never heard back from. 
After considering my options I decided to go with Joshua and Tiny House Basics and placed my deposit. Delivery time will be about 3-4 weeks since they have Memorial Day in there and have some custom work. 
I hope it is finished by end of June so that i can head out and have it back home before the 4th of July weekend. We will get regular progress updates from Joshua.

So ready to get this started. 

Saturday, May 18, 2019

The conversion starts

So today was a big day. On Tuesday, of this week, we received the big items needed for conversion of the semi tractor to an RV. In Texas to registrar your converted semi truck to an motorhome it must contain a few items.

Here is the official rules from the current version of the Assembled and Rebuilt Vehicle Manual issued by Texas

Used trucks, truck tractors, and buses, which have been reconstructed or converted to
contain living quarters to meet the definition of a motor home, should be titled as a motor
home and registered with passenger plates. Title applications on these vehicles should be
supported by both interior and exterior photographs, a certified weight certificate
verifying the gross weight, and a Rebuilt Vehicle Statement (Form VTR-61) explaining the
alteration. The make, year model, and VIN must be the same as that shown on the title
covering the truck, truck-tractor, or bus.
Living Quarters
Occupations Code Section 2301.002 (21) defines a motor home as

“Motor home” means a motor vehicle that is designed to provide temporary living
quarters and that:

Motor Vehicles Adapted or Designed for Human Habitation

Assembled and Rebuilt Vehicle Manual 11-2 TxDMV October 2017
(A) is built on a motor vehicle chassis as an integral part of or a permanent
attachment to the chassis; and
(B) contains at least four of the following independent life support systems
that are permanently installed and designed to be removed only for
repair or replacement and that meet the standards of the American
National Standards Institute, Standards for Recreational Vehicles:

  • (i) a cooking facility with an on-board fuel source;
  • (ii) a gas or electric refrigerator;
  • (iii) a toilet with exterior evacuation;
  • (iv) a heating or air conditioning system with an on-board power or fuel
  • source separate from the vehicle engine;
  • (v) a potable water supply system that includes at least a sink, a faucet,
  • and a water tank with an exterior service supply connection; or
  • (vi) a 110-125 volt electric power supply.
For my conversion I will be adding a 110 power supply, a refrigerator, a heating or air conditioning system and a cooking facility. The items wich arrived this week were the mini split heat pump and the semi-tractor refrigerator. I also was able to pick up the generator which I had purchased a fwe weeks prior but was out of stock.

Goal was to see how far i could get getting everything in place.

Here is a video of how the interior looked before we started.

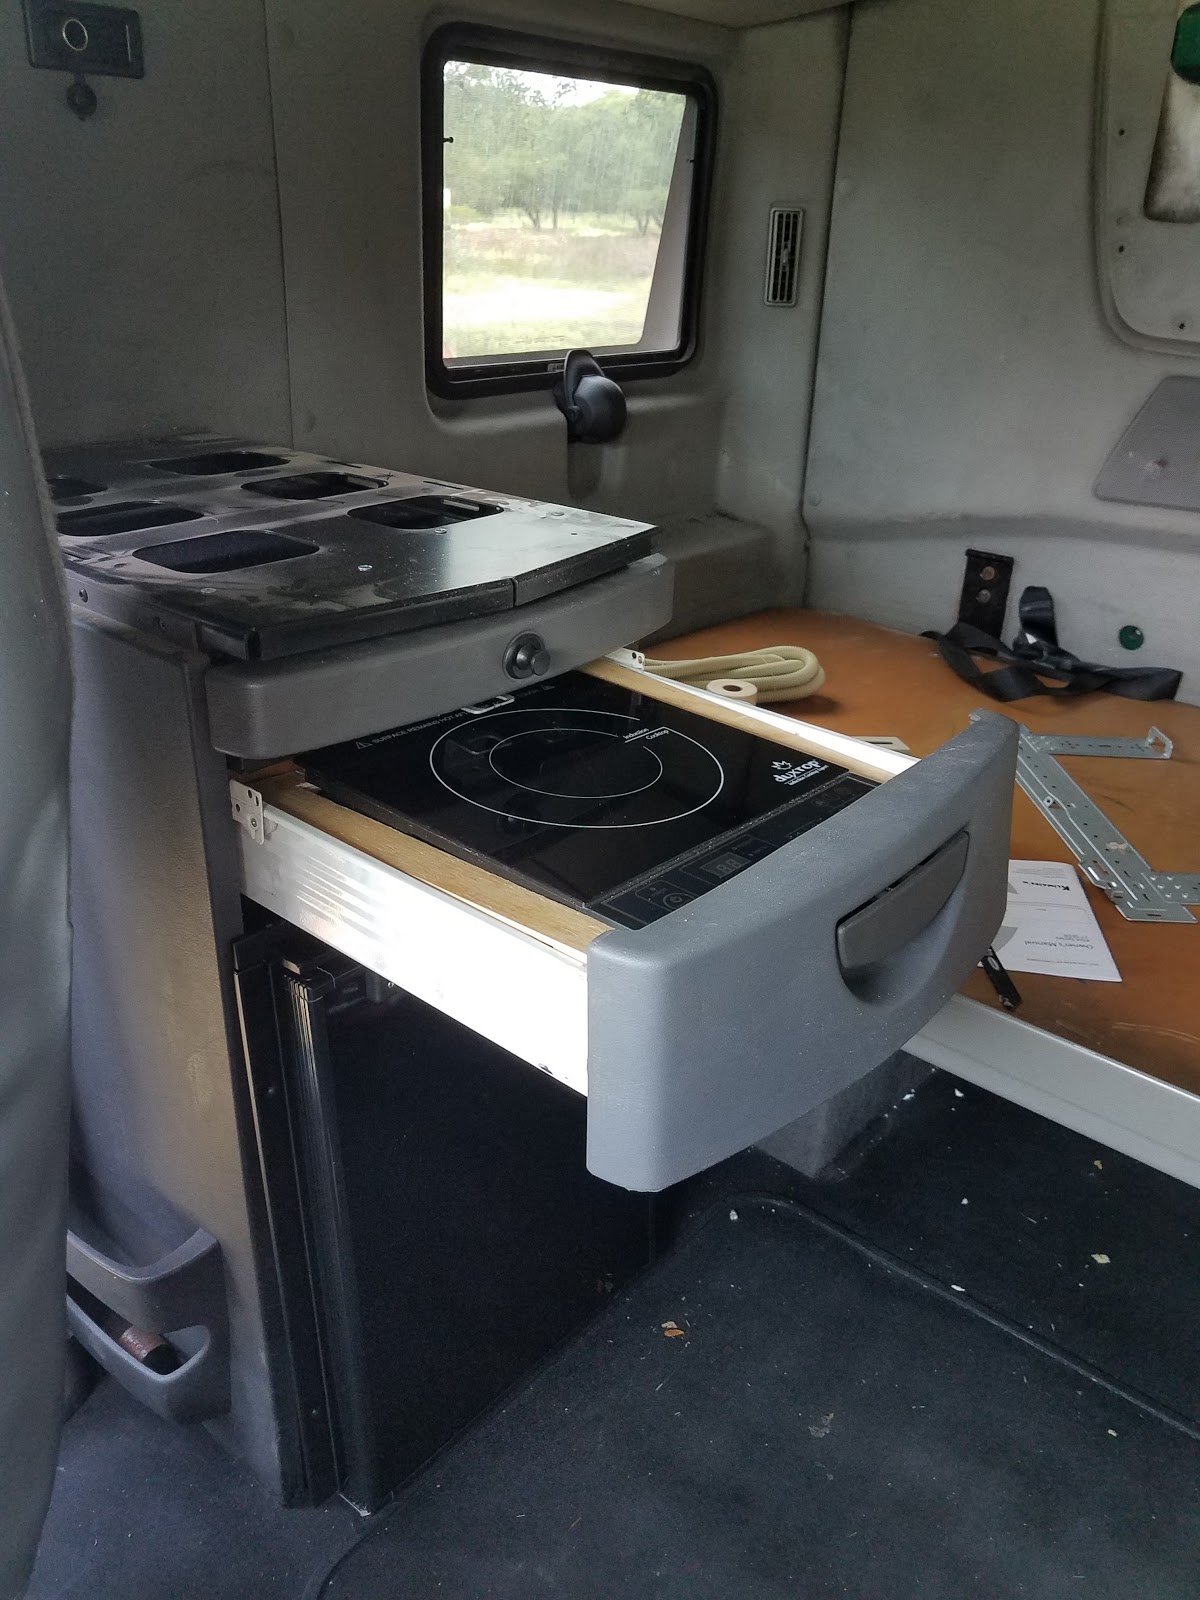
We wanted to start with seeing if the fridge was going to fit and if we could get the cook top in place. For the fridge, I went with an OEM replacement from TruckFridge. I had previously measured the cabinet and it should fit well. The one i got was their TF49 model for Prostars after 2009. After getting it un-boxed it fit well. I will have to find some screws for the final mounting, but slid right in and there is already a 12 volt connector to hook into. This should be an easy install.

The second part to get done today was to remove the top fabric section of the same cabinet as this is where i want to mount my cook top. For my cooking device i will be using a 110-volt induction cook top. The one i selected was a fairly cheep one from Amazon. I don't plan on using very often, and this is more to get it ready for titling. I do plan to make an extension which will secure it as required. I will then run a 110 volt plug over from my main panel to power it. I had oped to remove just the fabric section, but ended up removing the entire top.


This will be the next project to see if i just make an entire new top or if I try to reuse this one. I am thinking i will just make a new one, using the old one as my template.

I also un-boxed the air conditioner/header, but more on that in the next post.

Friday, April 19, 2019

My truck has been found....

After about 4 years of looking a being scared to commit, I pulled the trigger and purchased a truck. This is the second big step on the journy of Tiny House Big Truck. This is getting the "Big truck" part.
I already own a F350 4WD truck which I use for pulling equipment and trailers, however, I have been seeing a lot of the disadvantage of using a "light duty" truck for this. Times like pulling the bobcat in the dump trailer, the truck seems over worked, especially climbing the hills near Kerrville.

A few years ago, I found some folks who were converting semi tractors to pull large 5ht wheel trailers. Since I have always dreamed of full time RVing with a large trailer I became interested. I even attend the National HDT rally in  2016. I met a lot of folks using semi trucks and even got to drive two of them. Having already driven a bus, I was not scared of driving a large vehicle. Hey, I took my driving test at sixteen in a large passenger van.

My brother has also worked on some semi truck so figured he could help me with some of the maintenance and getting it ready.

The truck I purchased is a 2010 International Prostar with a 72" sleeper. It has about 450k miles so had a lot of life left in it.


Here are some photos.

Next up, getting it converted so that I can register it as a motorhome.